Automating SharePoint Online deployments using Octopus Deploy
The article Granting access via Azure AD App-Only shows how to setup app-only access to SharePoint using an Azure AD app registration with a Certificate. This article will show how to extend this to work with an Octopus certificate variable and pipeline.
Background
Using an App-Only approach to automate SharePoint Online deployments avoids the need to create user accounts in Azure AD for application identities. It also ensures the application always has access to all sites, and does not first need to be added as a user. If you are using Octopus Deploy in your organisation you may want to automate SharePoint Online tasks such as deploying SPFx packages using a pipeline or create an Octopus Runbook to automate tasks such as creating a site collection based on a PnP provisioning template.
How-to
The basic steps to setup Azure AD App Only authentication for an Octopus Deploy pipeline are:
- Create an Azure App Registration and upload the Certificate – This is covered in the article Granting access via Azure AD App-Only and includes creating a certificate, Azure AD app registration, requesting API Permissions and adding the Certificate
- Create Octopus certificate variable – Using the certificate added above you can then create an Octopus certificate and assign this to an Octopus variable
- Use the Certificate in an Octopus process/runbook – Assuming you have Octopus variables as follows:
- SharePointCertificate – certificate created above
- ClientId – the application/client ID of the Azure AD app registration created above
- Tenant – the name of the tenant e.g. contoso.com
You can create a deployment process that connects to SharePoint Online using the below approach:
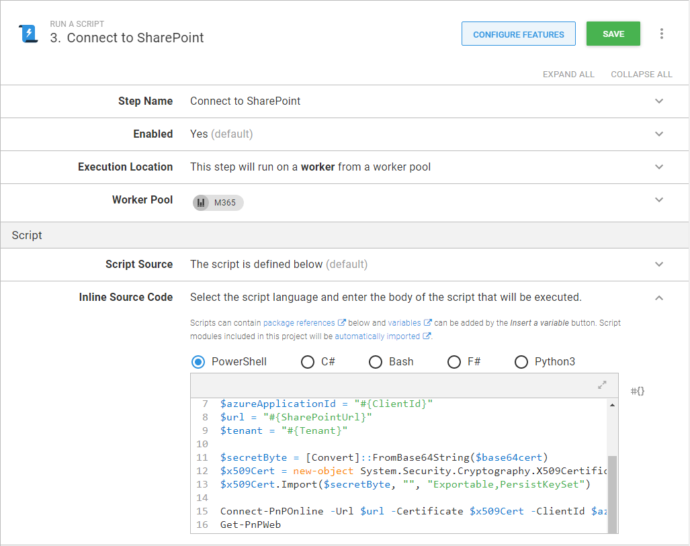
- Add a step to your deployment process (or Runbook) using the ‘Run a Script’ template
- In the Inline Source Code (or reference a script that does something similar) select PowerShell and enter the following:
if(!(Get-Module -ListAvailable -Name SharePointPnPPowerShellOnline))
{
    Install-Module SharePointPnPPowerShellOnline
}

$base64cert = "#{SharePointCertificate.Pfx}"
$azureApplicationId = "#{ClientId}"
$url = "#{SharePointUrl}"
$tenant = "#{Tenant}"

$secretByte = [Convert]::FromBase64String($base64cert)
$x509Cert = new-object System.Security.Cryptography.X509Certificates.X509Certificate2
$x509Cert.Import($secretByte, "", "Exportable,PersistKeySet")

Connect-PnPOnline -Url $url -Certificate $x509Cert -ClientId $azureApplicationId -Tenant $tenant
Get-PnPWeb
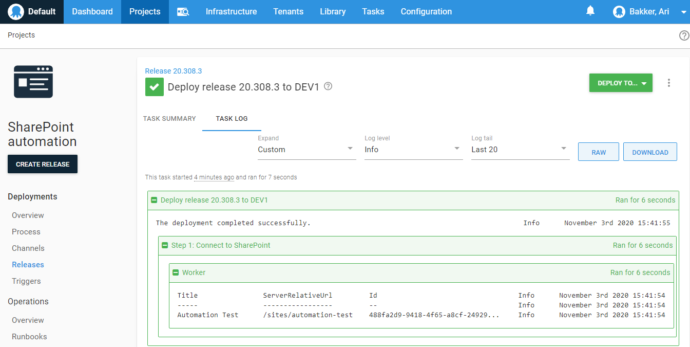
You should now be able to run the Octopus process and retrieve details of the current site using the Certificate/Azure AD App Only based authentication approach. You can then extend this using the other PnP PowerShell commands to deploy SPFx packages, apply PnP Provisioning templates or any other automated deployment related tasks you wish.
You will need to give some consideration to how you secure the Certificates in production environments but Octopus does provide the ability to restrict the ability to view and/or export Certificates to authorised users, as well as allowing you to restrict access to deploy to certain environments.
![]()
![]()
![]()
![]()
![]()